Step 1: Choosing the Right Size
Having your own sewing machine provides you with endless options to design and create with fabric. With just a few basic stitches and know-how, you can begin to make projects that suit your own taste and style. Projects for household items can either be made based on your own design or from patterns, and the same is true of clothing. Before you begin to sew clothing, either using a pattern or designing your own, there are a few things that you need to know how to do.
One of the benefits of sewing your own clothing is that you can create a custom fit garment. Everybody is different and every body is different. To get the best fit when sewing clothing, you need to find out precisely what size your body is. Most commercial patterns provide four to seven basic measurements to help you choose a size. By following the pattern manufacturer’s guide, you can find a close match to your body size, but it won’t match your body exactly. To get a truly custom fit, you will first need to learn how to measure all the parts of your body that come into play when making a garment and then how to alter your commercial pattern to fit you.
Whether you are looking for the general fit of an unmodified pattern or planning to alter your pattern for a custom tailored fit, you need to start with accurate measurements. In this article, we’ll talk about what measurements you need and how to get the best measurements so that you can get the best fit.
Getting started
Measuring Tape
Your body is curved, so you are going to need a flexible measuring tape to take truly accurate measures. Every seamstress should have this device anyway, so if you don’t have one, be sure to put it on your shopping list. Just a note: once you have this handy measuring tape you will find new uses for it, so when you go shopping I recommend that you buy more than one.
If you are ready to get started measuring and find that someone has carried off your tape, you can make due with a long strand of yarn or string. Use the string to wrap around or stretch along what you are measuring, mark the start and stop points and then measure this length using your straight measure. I know that sound’s complicated- And that’s why you need at least one flexible tape measure.
Measuring Assistant
With a lot of effort, you can measure your own body. But, you will get far more accurate measurements if you hold still while someone else does the measuring. Ask a friend to help you, or consider hiring a seamstress to take your measurements for the best and most accurate results. When you take your measurements, wear light and close-fitting clothing that doesn’t add bulk to the final total. Stand straight and relaxed during the measuring process. It is also best to wear the undergarments that you wear most often. If you are measuring for a specific pattern, you should wear the undergarments you intend to wear with the item once it is created. For general measurements, you should either wear flat shoes or no shoes at all. If you are taking your measurements for a special outfit, wear the shoes that you have selected to go with your new garment during measuring.
Basic Commercial Pattern Measurements
Most commercially produced patterns will provide measurements for a range of sizes. You will find the list of measurements for each size located on the back of the pattern envelope. The pattern you select will often provide patterns for more than one size. This allows you to choose a pattern even if your measurements fall somewhere between two sizes and you can also combine pattern pieces if you don’t neatly fall into a “one-size” category.
Below is a size chart from a leading commercial pattern manufacturer, Kwik Sew:

This size chart lists the size range for each type of garment, from infant clothing to misses’ styles. If you notice, the primary measurements for women’s clothing are the bust, waist, hips, and back waist length. Depending on what range your measurements fall within on this chart, you would choose to purchase a pattern size of extra small, small, medium, large, etc. Some patterns assign numbered sizes, so a single pattern might be for sizes 10 to 12, or 12 to 14.
When you purchase a pattern, it will usually feature only the size chart for one type of wearer. In addition to listing the measurements for the sizes included in the pattern set, the back of the pattern will also provide additional information. Don’t worry about the other information right now; I’ll explain that all to you another time.
[su_note] Let’s look at our pattern envelope for this
Simplicity misses’ size dress.
[/su_note]This envelope contains a pattern that can be cut to fit one of six sizes. You will need to look at the measurements for each size to determine which pattern line to cut. This size selection also guides the amount of fabric you will need to purchase. Looking at the pattern, you can see that you will need to know your four primary measurements to select the correct size.
Determining Your Measurements
Once you know your measurements, you’ll need to select a pattern. Now, it’s time to get the figures on your figure.
Bust Measurement
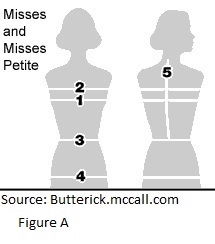
To measure your bust, wrap the measuring tape around your bust at the fullest part. Make sure that the tape does not slant up or down when going across your back as this will increase the measurement. (See Fig. A, Line 1.) This measurement is not the same as a chest measurement that is taken by measuring the fullest portion of your chest above the bust line. (See Fig. A, Line 2.) Remember to wear your usual undergarments when taking this measurement.
Waist Measurement
You want to measure your waist at the natural point of movement. (See Fig. A, Line3.) Try leaning from side to side to get an idea of what feels comfortable. You might also wrap a string or piece of elastic around your waist to find the right spot. This measurement is for your personal wardrobe, so choose the waist line that is comfortable for you and take your measurement there.
Hip Measurement
Your hip measurement should be taken at the fullest point around your hips. (See Fig. A, Line 4.) Usually, your hip line is seven to nine inches below your waist. You do want to make sure you measure the widest point of your hips as otherwise your garment will fit too tightly.
Back to Waist Measurement
This measurement, sometimes called back-neck to waist, measures how long your torso is. (See Fig. A, Line 5) This is not a measurement of your full height but provides you with an idea of what length bodice your garment will need. This measurement will be very difficult to take without assistance! To find this measurement, lower your head and locate the top of your spine, the point where your neck bends. Measure from this point to your natural waistline. If you used a string to mark your natural waist earlier, measure to that point.
If you don’t have someone available to help you with this task, it can still be accomplished. Back up against a mirror and use either a dry erase, eyeliner, or other removable marker to mark on the mirror the point where your neck bends. (You can back against a wall, but it is much harder to erase later.) Standing in the same place, make another mark at your natural waistline. Step away and measure the length between the two points that you marked.
Find Your Pattern
With your measurements in hand, you can now select a pattern that will be in your size range. Now is a good time to start thinking about the style and fabric you’d like to use for your next project. We’ll discuss more about sizing and pattern selection soon. Until then, let your creative side explore the possibilities.